


Super© If you need a simple, yet very efficient tool to convert (encode) or play any Multimedia file, without reading manuals or spending long hours training, then SUPER © is all you need. It is a Multimedia Encoder and a Multimedia Player, easy-to-use with 1 simple click.
What is SUPER:
SUPER © is totally FREE to download and to use. It plays & converts very fast full length movies to any other format with NO time limitation.
SUPER © does NOT require any additional external codec to be installed, absolutely nothing. Necessary codecs are built in!
SUPER © can also play and save Internet Media Streams with different protocols ( mms:// rtsp:// http://)
I'm gonna show you how to convert FLASH Videos using SUPER. Flash movies could be found on many websites like YouTube, Google Video, Bolt and Similer sites. Flash video file extention is .FLV. Lets see what we need as a startup.
- Recommended to have Windows XP
- Windows media player 10 or at least 9
- I personally recommend using K-Lite Codec Pack.. It has all the codecs and can play any kind of video. Grab it.. It's about 42mb.. phew
- Now click here to grab the Latest version of SUPER. It's about 26mb
- Once you've downloaded SUPER. Go ahead and install it into your computer. There will be an icon sitting on your desktop and start menu after a successful install.
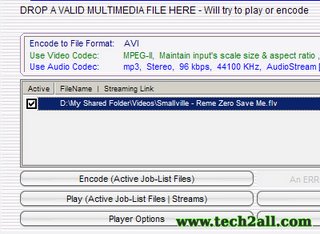
- Click on the SUPER icon to open it. The screen should look like the picture below

- Ok now Set the "Ouput Container" as AVI and other parameters as like the picture below.

- Right Click on the Interface to Access the Menu. You can add files, remove files.. etc from the Menu. Disable the Hints from the menu. Most systems the hints creates some problems.

- Ok now add some Flash video files at the list. Remember you can "DRAG and DROP" files from windows explorer too.
- You can select the "Output Folder" for your converted videos. Just right click on the main progam and Select the "Specify Output folder Destination" menu item.

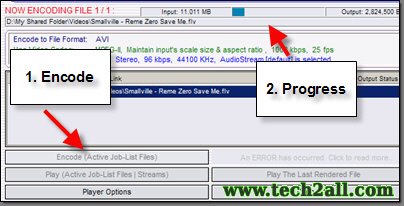
- Well, We're almost done.. Just Click on the Button "Encode (Active Job-List Files)" and look at the progress bar to finish.

- Thats it .. You've just converted your Flash video to Windows AVI-Mpeg format .. Later You can burn it into a VCD.


0 comments:
Post a Comment